Most people have never heard of the Copenhagen plank. The ones who have usually found it through injury — a groin strain, a hip issue, a physio who scribbled it on a rehab sheet.
That's the wrong way to discover it.
Because this exercise deserves a regular spot in training — not just injury recovery. It targets muscles that standard gym programming almost completely ignores. And the consequences of ignoring those muscles show up eventually — groin strains, hip instability, knees that cave during squats, lower back issues that don't make obvious sense.
Five minutes in a session. No equipment needed if you have a chair at home. Here's everything.
What Is the Copenhagen Plank
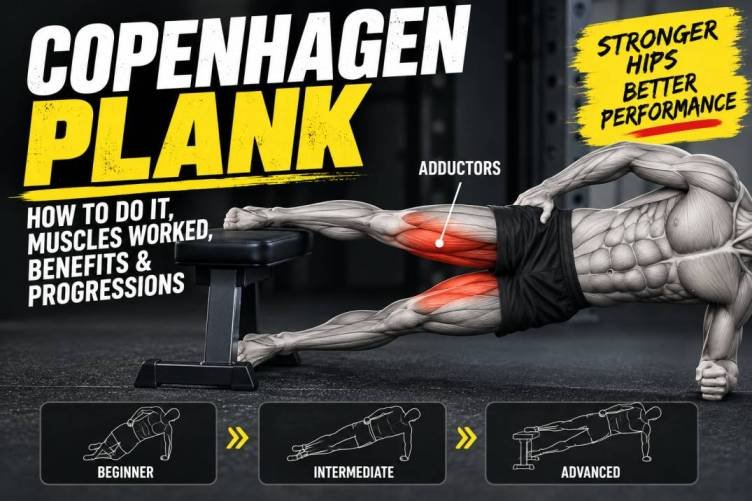
It's a side plank variation. But instead of your bottom foot on the floor like a regular side plank, your top leg rests on a bench, chair, or box — and the bottom leg either hangs in the air or rests lightly beneath.
In a standard side plank, your obliques resist gravity pulling you down. In the Copenhagen plank, your adductors — inner thigh muscles — have to actively squeeze and hold to keep the position. The core still works. But the adductors are doing something they almost never do in regular training: resisting lateral load under sustained tension.
The name comes from research published out of Copenhagen, Denmark. A 2019 study in the British Journal of Sports Medicine found Copenhagen plank training significantly cut groin injury rates in professional football players. After that, the wider fitness world started paying attention.
Muscles Worked
Adductors — the main target. Adductor longus, brevis, magnus, gracilis, pectineus. These run along the inner thigh and pull the legs toward the midline. They're critical for change of direction, kicking, hip stability during running. Despite this, most gym programmes have zero direct adductor work.
Obliques and lateral core — the side plank position demands significant oblique activation to keep hips elevated and spine neutral throughout.
Glute medius — stabilising the hip on the working side throughout the hold.
Hip flexors — particularly in the full version where the bottom leg is held in the air.
Quadratus lumborum — deep lower back muscle involved in lateral spinal stability. Works quietly but meaningfully here.
The combination of adductor and core loading simultaneously is what makes this exercise genuinely different. A cable adductor pull and a standard plank are separate things. The Copenhagen plank does both at once — and that combination is exactly what the hip needs for real-world stability.
Why Most People Have Undertrained Adductors
Standard leg training hits quads, hamstrings, glutes, calves. Adductors assist as stabilisers in squats and lunges but are never the primary mover. Never specifically loaded. Never really challenged.
Over time: adductors that are chronically weak relative to the muscles around them. That imbalance shows up as groin vulnerability, hip instability, knee valgus during squats and running. In athletes playing football, hockey, cricket, basketball — sports involving lateral cuts and direction changes — undertrained adductors are one of the most common factors behind groin strains.
The Copenhagen plank fixes this directly. And the research backs that claim more clearly than most exercises can claim.
How to Do It — Proper Form
What you need: A bench, box, or sturdy chair. Roughly 40–50cm height works for most people.
Setup:
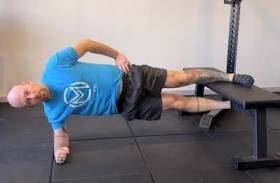
Lie on your side. Rest your top leg on the bench — the shin or lower part of the leg, not the ankle dangling off or the thigh sitting on it. Supporting elbow directly under the shoulder, forearm flat.
The hold:
Drive hips off the ground until your body is a straight line from head to top hip. The top leg is pressing into the bench — that's the adductor working to hold you up. Bottom leg can rest lightly beneath the bench or be held in the air.
What to focus on:
Hips stay stacked — don't let the top hip roll toward the ceiling. Chest faces forward, not down toward the floor. Spine neutral — no sagging in the lower back.
Breathe normally. The isometric hold is hard enough without holding your breath making it worse.
Common Mistakes
Hips dropping toward the floor. Obliques fatigue and the position collapses. When this happens, the adductors stop working effectively. Drop to an easier progression rather than grinding through with bad position.
Top hip rotating forward. Turns it into a front plank. The adductor loading disappears. Keep both hips stacked directly over each other.
Wrong leg position on the bench. Thigh on the bench shortens the lever too much. Foot dangling creates ankle instability. Shin on the bench is the right position.
Holding breath. Makes the hold feel significantly harder and limits how long you can sustain quality position.
Progressions — Beginner to Advanced
This is where those four images become genuinely useful — because they show exactly what each level looks like in real life.
Level 1 — Home Version: Chair Copenhagen Plank
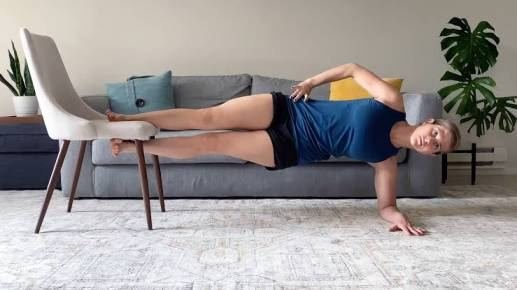
No gym needed. A regular chair at home works perfectly for starting out.
The chair version is slightly less stable than a fixed bench, which actually adds a small balance challenge. But it's completely accessible and the adductor loading is identical to the bench version.
Start here if: You've never done this before. You're returning from a groin or hip issue. You train at home.
Programming: 3 sets of 5–8 second holds per side. Rest 45 seconds between sides.
Level 2 — Standard Copenhagen Plank
Full side plank position with the top leg on the bench, bottom leg resting lightly on the floor for balance assistance.
This is the version most people work toward first. The "PRO" level in Image 2.
Programming: 3 sets of 10–20 second holds per side. When 20 seconds feels controlled — genuinely controlled, not survived — progress.
Level 3 — Copenhagen Plank, Bottom Leg Elevated
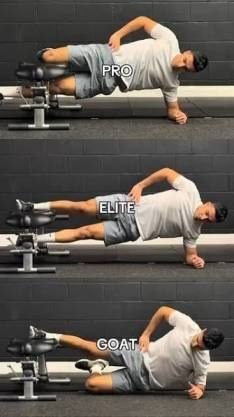
Same position but the bottom leg is now held in the air instead of resting on the floor. Removes the balance support entirely. Core and hip stability demand jumps significantly.
The "ELITE" level in Image 2. The "GOAT" version takes this further — longer holds, higher bench, more complete body tension throughout.
Programming: 3 sets of 15–25 second holds per side.
Level 4 — TRX / Suspension Copenhagen Plank
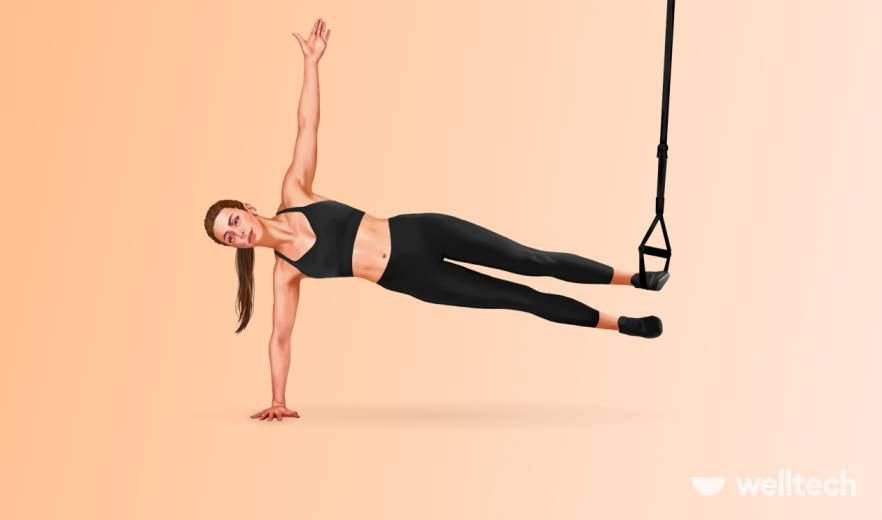
This is the most demanding version. Instead of a fixed bench, the top leg is in a TRX or suspension strap — which means the surface is unstable and constantly shifting. The adductors and core have to work continuously to prevent collapse in any direction.
Reserved for people who've been doing the standard version consistently for several weeks and want a genuine challenge.
Not everyone has TRX access — skip straight to dynamic progressions if this isn't available.
Programming: 3 sets of 10–15 second holds per side. Even experienced people find this humbling.
Programming Guide
| Level | Version | Sets | Hold | Frequency |
|---|---|---|---|---|
| Beginner | Chair version | 3/side | 5–8 sec | 2–3x/week |
| Intermediate | Standard bench | 3/side | 10–20 sec | 2–3x/week |
| Advanced | Bottom leg up | 3/side | 15–25 sec | 2–3x/week |
| Elite | TRX suspended | 3/side | 10–15 sec | 2x/week |
Where it fits in a session:
As a warm-up — 2 rounds before lower body training. Wakes up the adductors and hip stabilisers before squats, lunges, or sport-specific work.
As an accessory movement — after main compound work. 3 sets per side adds maybe 6–8 minutes total.
As standalone prehab — 3–4 sets per side, 2–3 times per week. Particularly useful for athletes or anyone managing hip and groin issues.
Who Should Be Doing This
Football, hockey, cricket, basketball players — the groin injury prevention evidence is strongest for lateral movement athletes. If your sport involves cutting, changing direction, or kicking — this should be in your weekly routine. Not occasionally. Weekly.
Runners — adductor weakness contributes to knee valgus during running, a risk factor for IT band problems and patellofemoral pain. Strengthening this chain helps.
Anyone whose knees cave during squats — hip adductor weakness is frequently a contributing factor. Fixing the adductors often visibly improves squat mechanics within a few weeks.
People returning from groin strains — after appropriate rest and initial rehab, Copenhagen plank progressions starting from the chair version are one of the best return-to-sport tools available. Get physio guidance on timing.
Regular gym-goers who never directly train the inner thigh — which is honestly most people. The adductors are one of the most consistently undertrained muscle groups in recreational training. This is the most practical fix.
The Short Version
Five minutes. A chair or a bench. Two or three times a week.
The Copenhagen plank targets muscles that standard leg training never touches properly — and the evidence for what that targeted work does for injury prevention and hip stability is cleaner than most exercises can claim.
Start with the chair version at home if you're new to it. Work up through the progressions. The TRX version is there when you want something genuinely difficult.
Add it. The hips will thank you eventually.
Currently managing a groin injury or hip pain? Consult a physiotherapist before starting. The beginner chair version is usually appropriate early in rehab — but get guidance on timing and load first.